Monday 12 June 2017
How to display names using Button in Android
Download source code
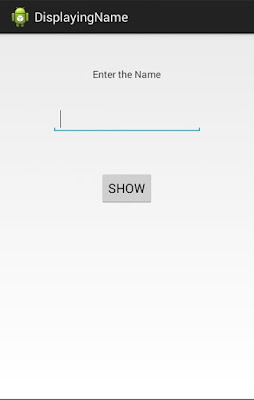
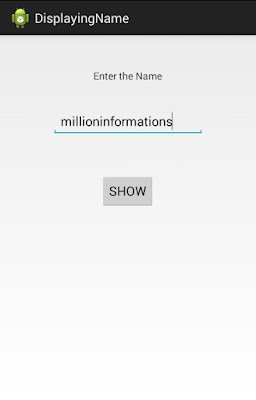
In this post we are going to display name which we are going to enter in a text field and when the button is clicked the entered name will be displayed.First we need to create a new Project in Eclipse IDE.
File ----> New ---> Android Application Project.
Give the project name and click Next--->Next-->Next--->Next---->Finish.
While creating any Project we need to make a simple design overview of that application.
It can be drawn in Paper or in Paint application.
Here I am using the first method , drawing the design in a paper.
Like this we are going to design the User Interface.
Open activity_main.xml file under DisplayingName(ProjectName)---->res---->activity_main.xml
Then find the Palette and Drag and drop the TextView element .
Then we need a place to enter the name that is called a plain text element which is found under the TextFields area.
Next we need a Button
After that we need to display the entered name for that we need text view.
Now our required elements are placed in our project, now we need to make some editing of the elements.
First we need to rename the textview, for that we need to right click on the textview--->EditText option.
Then we need to enter our desired text and click Ok.
After that you can see that the edited text will appear
Like that we can edit the Button name as Show and the last TextView to empty.
we can clear those warnings.
Go to values----> String .xml and open it.
Then type as in the image
After come to activity_main.xml and type as in the image.
Do the same for button and give the input type as text in Edit text
Now save all the errors and warnings will be gone now.
Next we need to start coding the java part for displaying the name.
Open MainActivity.java under the src folder.
Register the button and implement the interface and override the unimplemented methods as we saw in last post
Read Post
You can see the Button ID , Text Id in activity_main.xml
The coding till the last post is
We need to register the plaintext i.e edittext and text view to get the input and display the output.
Then we need to code the button part as in the image
The code is in the image.
Then Run the Program , right click on the Project Name and click Run as---> Android application
Read how to run Android app in your Mobile
The output is
input is the name of the edittext and getText() method is used to get what ever the text that the user gives inputs and settext is to set the text we want .
MainActivity.java
public class MainActivity extends Activity implements OnClickListener
{
EditText input;
TextView output;
@Override
protected void onCreate(Bundle savedInstanceState)
{
super.onCreate(savedInstanceState);
setContentView(R.layout.activity_main);
input=(EditText)findViewById(R.id.editText1);
output=(TextView)findViewById(R.id.textView2);
Button show=(Button)findViewById(R.id.button1);
show.setOnClickListener(this);
}
@Override
public void onClick(View arg0)
{
// TODO Auto-generated method stub
String name=input.getText().toString();
output.setText(name);
}
{
EditText input;
TextView output;
@Override
protected void onCreate(Bundle savedInstanceState)
{
super.onCreate(savedInstanceState);
setContentView(R.layout.activity_main);
input=(EditText)findViewById(R.id.editText1);
output=(TextView)findViewById(R.id.textView2);
Button show=(Button)findViewById(R.id.button1);
show.setOnClickListener(this);
}
@Override
public void onClick(View arg0)
{
// TODO Auto-generated method stub
String name=input.getText().toString();
output.setText(name);
}
This simple example will make you motivated to become an android app developer.
You find any error in this example send to my mail narain2829@gmail.com .
Sunday 11 June 2017
How to use Buttons in Android App
Download Source code
In this post you can learn the fundamental working concept of Buttons in Android .
I am using Eclipse IDE for this example but it does not differ too much with Android studio. So users who are using Android studio also can refer this example.
First create a New Project in Eclipse IDE.
It is same as that of creating Hello World app which I have already posted before.
Read How to develop Hello World app or Creating New Project in Eclipse IDE
In that post after creating a New Project and before going to run the Helloworld app we are going to create a Button.
Creating a button is very easy .
Look for the Pallet option near the work space area.
In that you can see the Button option in it.
Simply click and drag that Button and place anywhere in the work space.
You can remove that warning symbol by reading this post resolve warning.
Although it does not causes error it is better to avoid those warning, you can continue coding with that warning also.
Next we need to give action to that button when it has been clicked.
Now its time to java code.
You need to register your button with the MainActivity.java and then can write action code of button.
First go to MainActivity.java which can be found under the res folder.
Then open MainActivity.java file, it will like in the below picture
in the above you can delete the selected code which not going to useful for us in this example.
after deleting we need start writing the button code below setcontentview line
First we need to register the Button.
it can be done by:
Button b=(Button)findViewById(R.id.button1);
I will explain the code in detail later in this post.
After typing the code you may find some errors.
It is nothing but we need to import the Button widget, just move the mouse over that error you will see
Click Import 'Button' (android.widget)
Now the error is gone.
After this we have to write the code to detect when the button is clicked, this is similar to listening to the button click , we need to set the onClickListener to the button like:
b.setOnclickListener(this)
If you type the following code you will get error, just move over the error and you will see the options
In that scroll down and you will find Let MainActivity implements OnClickListener and click it.
Then after implenting the OnClickListener class again there will be an error to implement the overriden classes from the implemented interface
Move the mouse over the error and click add unimplemented methods
After clicking that you can see onClick() will be overrided
Inside the onClick() method only we are going write the code for the button action.
In this example i am going to print a message 'Hai' with the help of Toast.
Toast is a short message appears at the bottom of the screen for short time of period ex:3 sec or 5 sec .
This is the code for the Toast message.
That's it , after done the above run the program.
To Run the Program read
How to use Android Phone as an Emulator
How to Create an Emulator in Android Eclipse
Emulator is nothing but it is place to run the Android apps that we have developed.
The output will be
After clicking the button
Code Explanation:
Button b=(Button)findViewById(R.id.button1);
In the above code Button is an UI element in Android it is like a Data type.
b is a object or name of the button which used through out the program to use a particular button.
(Button) is a Type Casting the button we have created is of View type we have to convert into Button type.
Every button has its own id , in our example the id of our button is button1.
we can find it by findViewById method.
This the first step.
The next one is setting the OnClickListener method to the created button.
then we need to implement OnClickListener interface and add the unimplemented methods.
then the onClick method will be overridden, inside that we need write the code.
Toast is to display the short message , it is like a notification.
makeText is a method to describe where the text message should be appear , what is the message to be appear and the duration of the Toast message.
MainActivity.java
public class MainActivity extends Activity implements OnClickListener
{
@Override
protected void onCreate(Bundle savedInstanceState)
{
super.onCreate(savedInstanceState);
setContentView(R.layout.activity_main);
Button b=(Button)findViewById(R.id.button1);
b.setOnClickListener(this);
}
@Override
public void onClick(View arg0)
{
// TODO Auto-generated method stub
Toast.makeText(getApplicationContext(), "Hai", Toast.LENGTH_LONG).show();
}
}
{
@Override
protected void onCreate(Bundle savedInstanceState)
{
super.onCreate(savedInstanceState);
setContentView(R.layout.activity_main);
Button b=(Button)findViewById(R.id.button1);
b.setOnClickListener(this);
}
@Override
public void onClick(View arg0)
{
// TODO Auto-generated method stub
Toast.makeText(getApplicationContext(), "Hai", Toast.LENGTH_LONG).show();
}
}
We will discuss the above concepts in detail in the upcoming posts.
Sunday 2 April 2017
Solve Couldn't resolve resource @string/your_text warning
The actual coding will be like the above image but the beginner will try to change the hello_world like this:
The text may be anything , here i am using Welcome.
the error will come like this :
Why this is error is coming means , the @string/ resembles the string.xml under the values folder under the res folder which i have discussed in the previous post.
Read here:
Project Structures in Android Eclipse
In order to add a new text we need to add the text in that string.xml folder.
Follow the following steps :
1.Open res ----> values ----> string.xml
In this add a new line as follows:
<string name="welcome">Welcome</string>
Thus the error Couldn't resolve resource @string/your_text was successfully cleared.
read here:
Hello World app in Android
Android Project Structure in Eclipse
The Project Structure in Android ADT or Eclipse and also in Android Studio is very important to understand.
We need to be aware what are the all available project files when we create an application.
The Project Structure can be seen on the left side of the Eclipse or Android Studio window.
The Project Structure contains all the java packages, classes, xml files, icons, images which we use in an Android app.
This is the Complete Project Structure.
The Src folder is called as the Source folder.
This folder contains all the Java Packages and Java Classes that we are creating and using.
The gen folder is called as Generated java files folder.
This Folder contains automatically created java files which contains
1.BuildConfig.java file and
2. R.java files.
In which the R.java file contains the automatically generated java class which contains the automatically generated integer values for every thing you are using in a project.
If you see the image you can see an integer value is generated for @string/hello_world which we have used in the xml file.
The next folder is the Android sdk or platform folder which contains android.jar file, we are not going to use this one and the next folder is Android Private Libraries which contains the necessary libraries.
The assets folder consists of static files , we are not going to use this folder also.
The bin folder consists of Compiled classes and executable files.
The next and the most important , which we are going to use in every android application development is the res folder.
The res folder is called as the resource folder.
It contains the Layout folder which will contain the xml file, which will be used to design the User Interface.
Under the res folder there are two main folders need to be known
1.Layout folder and
2. Values folder
the Values folder contains
1. dimens.xml
2. strings.xml
3.styles.xml
the dimens.xml file is used to specify dimensions(size) which can be used through out the developing the application.
the strings.xml file is used to specify every text that we are going to use in our application.
the styles.xml file is used to define some styles which can be used in designing the User Interface.
we will learn about these folders in more detail in the upcoming posts.
See the following image of res folder.
The last and the most important file is AndroidManifest.xml file. This file is used to set which activity to be run while the application starts , means that while you are creating an application you will use more than one activity.
An activity is said to be combination of JAVA class+ XML file, so which activity we should run first we can specify using intent-filter in the AndroidManifest file.
we will learn about the intent-filter later, if you see in this Android Manifest we can give permissions like, if we want access our phone camera , then we need to add camera permissions, like that.
This AndroidManifest.xml file is also used to generate the apk files which we will be going to upload in Google Play Store.
These are the folders in a Project , and we saw what are its usages.
In upcoming post I will post more about these folders.
Read here:
Java Concepts required to develop Android Apps
Java Concepts required for developing Android apps
In the previous posts, we have learned the software setup and emulator creations, which are very mandatory for the Android app development.
In this post i am going to tell about what are the java concepts required to develop android apps.
Yes, the android apps are created using java programming , so we need to learn the some Java Concepts to create Android apps.
The Android app development is done using two things.
1.Java code to implement the app functionality
2. XML code to design the User Interface( UI ).
In java there are lots of concepts but we do not need all the concepts to develop simple android apps.
Following concepts are enough to develop an android app:
A simple Info-graphic:
1. Basic programming Concepts. ( this is just fundamentals)
2.Data Types
3.Operators
4.Control Statements(this concept is very important)
5.OOPS (Object Oriented Programming)
6. String Handling
7.Array List
8.Basics of Multi threading (For advanced apps)
9.Basics of Exception Handling (For advanced apps)
If you want to learn java no need of any programming experience before. Just by reading some below post you can easily learn Java.
First you need to be familiar with programming for that purpose read some simple C programming...
1. How to run a C program
2. How to add 2 numbers in C
3. Decision Control Statements
4. Loop Control Statements
If you are already familiar with this concept just, skip to start learning java.
After becoming familiar with this fundamentals let start to learn about java.
1. How to Run a Java Program
2.How to add 2 numbers in java
3.How to get input from the user
4. Classes and Objects in Java
If you already know the above concepts just start learning the required concepts.
Practice the above concepts till you become familiar with that.
After that start to learn the Required Java Concepts for developing android applications.
There is a perfect blog to learn all Java concepts that is www.javatpoint.com .
This blog will provide A-Z knowledge in java.
You can learn what you want , try to first complete the above mentioned required java concepts required to develop android apps , then if you want you can learn more.
Read here:
How to develop Android apps
Subscribe to:
Posts
(
Atom
)


