Showing posts with label TUTORIALS. Show all posts
Showing posts with label TUTORIALS. Show all posts
Friday 31 March 2017
HelloWorld app in Android
For beginners it is recommended to use ANDROID DEVELOPMENT TOOL (ADT) eclipse .
After some core concepts, i will use Android Studio.
Read How to develop Android Apps and download the tools required to Create the android apps.
Open Eclipse by double clicking the eclipse icon found in the folder where you have downloaded the ADT bundle. In my laptop i have saved it in the following path
D:\Development\ADT\adt-bundle-windows-x86_64-20140702\eclipse.
Double click the eclipse icon.
After that it will load.
This is what you will see after ADT is opened.
1. File-----> New-----> Android Application Project
Enter the Project name , where you want to store , minimum version to run your application etc...
as follows...
Then click Next, Next , Next until Finish comes.
In the above screen you can choose the folder where you can store the project works and click NEXT.
In the above window you can choose your own icon which will be displayed as your app icon when you installed in your mobile, we will discuss it on upcoming post.
Click blank activity and NEXT.
Then click Finish.
I will explain about what is Activity name later.
Then the Work space will be opened.
Then right click on the Project name and click Run As----> Android application.
You need to select an emulator, I will tell how to create an Emulator, how to use our Android phone as an Emulator in my next post.
Just now we see how the output is coming.
Output in Mobile.
It is recommended for the beginners as well as developers to use Mobile as an Emulator which is 10 times faster than the Emulator.
In next post i will tell you how to create an Emulator and how to use our phone as Emulator.
Read Here:
How to Create an Emulator in Android Eclipse
Thursday 30 March 2017
How to develop Android apps
 |
Android OS based Smartphones are in the market since 2010 and now the Android's Share has reached the tremendous rate 88% in the total Smartphones market.
This shows that the Android is unbeatable in the upcoming technology era.
Thus the usage increased the android app developers are in demand, understanding this many students coding geeks and others who have the interest in android are now into the learning process of Android app development.
So i will try to provide some basic foundations for learning android app.
There are several blogs and YouTube channels that are teaching Android app development for free.
One of the blog which is good and easiest way to learn is ramsandroid4all.blogspot.in which will provide all the core and advanced concepts in Android.
Also you can refer the YouTube channel Slidenerd www.youtube.com/user/slidenerd.
In this post, i am going to write about how to develop android apps, what are the tools required to develop an android apps.
Requirements:
1.Android Developing Tool(ADT) --- Download
2. Android Studio --- Download
3. Java Development Kit (JDK) --- Download
The installation process after downloading the above software is easy.
Click this link to setup Environmental Variable which may be required sometimes.
The Eclipse and Android studio both can be used to develop an android app, but the Android Studio is the Official Android app development tool provided by google.
However, it is recommended for the beginners to use Eclipse (ADT) to start learning which is easy to learn.
After having some core concept knowledge in android then you can switch over to Android studio.
System Requirements:
RAM:
minimum: 2GB
Recommended: 8GB
Operating System:
Windows 7 and above, linux based OS, Mac.
Stick to any one author , then only you can learn without getting any confusion.
In my next post i will try to provide some android programming concepts.
Read Here:
HelloWorld app in Android
Saturday 13 February 2016
Data types in Java
Hello mate, In this post I am going to tell you about the Data types used in Java. In the previous Java tutorials, we have learned about Java variables, objects, classes, methods etc...
Now we are going to learn about the data types used in JAVA.
While coming to the normal way of programming to instruct a machine the knowledge of data types is more important. It’s like knowing alphabets of a language before going to learn a new language. For every programming language, there will be some sort of data types.
Data types are the basic things that need to be known when creating a program for performing some mathematical operations. Data types can be used to specify how data is represented in JAVA. In our previous tutorials “How to get input from the user” and “Addition of two numbers” there was something like “int a,b;” mentioned that they are integer Data Types. While doing such calculations, it is necessary to mention the type of data. Two types of Data types in Java.
They are,
- Primitive Data types
- Reference Data types
Primitive Data types:
Primitive Data types are the basic and predefined Data Types in Java. When considering about Data Types Eight primitive Data Types are getting important. They are
Integer:
- For representing the whole numbers, integer data type is used. Like integer short, long and byte are also used for representing whole numbers.
- But they are different in their length.
- The range of int data type is from -2,147,483,648 to 2,147,483,647.
- Default integer type value is 0.
- The size of integer Data Type is 4 bytes.
Example:
int a,b,c;
Here a,b,c are the integer type variables. Naming considerations of these variables are explained in Variables.
Long:
- If integer data type is not sufficient, long is used to represent large values than the integer.
- The range of this data type is from -9,223,372,036,854,775,808 to 9,223,372,036,854,775,807.
- The default value of this Data Type is 0L.
- The size of long Data Type is 8 bytes.
Example:
long g;
Here g is a long type variable. Long Data Types are rarely used in basic programming.
Short:
- Short can be used for representing short values (whole numbers).
- Its range is from -32,768 to 32,767.
- The default value of this Data Type is 0.
- The size of short Data Type is 2 bytes.
Example:
short k;
Here k is a short type variable.
Byte:
- This is the smallest data type for representing whole numbers.
- Byte Data Type ranges from -128 to 127.
- Its default value is 0.
- The size of this Data Type is one byte.
Example:
byte h,g;
Here h and g are byte type variables.
Float:
- Float and double are used for representing the decimal point numbers such as 2819.248.
- These data types are also called as Real types.
- The default value of Float is 0f.
- The size of this Data Type is 4 bytes.
Example:
float r;
Here r is the float type variable
Double:
- The double data type is also same as Float, used for representing decimal point numbers larger than Float.
- Ranges from to.
- The default value of the double is 0d.
- The size of this Data Type is 8 bytes.
Example:
double h;
Here h is a double Type variable.
Boolean:
- The boolean data type can take Boolean values true and false in the form of 0s and 1s.
- A Boolean variable can be assigned to a Boolean value or to an expression which returns a Boolean value.
- Its default value is ‘false’.
Example:
boolean d=false;
(OR)
int a=45;
System.out.println((a>40));//which returns a Boolean value as 1(one)which indicates condition is true.
Character:
- The character is a data type that allows single character (mostly alphabets but it allows any type of letters) to scan and print.
- The size of character data type is 2 bytes.
- Its default value is “\u0000”.
Example:
char a;
Here a is the Character type variable.
Literals:
Variables assigned with a particular value are called as literals, the value of the variable is not getting changed throughout the program. Literals are similar to enumerations which are having the same meaning but declaration of enumerations is difficult.
Example:
byte b=40;
char c=’k’;
Reference Data Types:
Reference data types allow the user to define the size of the data. Using this data type user can dynamically allocate the size. Reference data types in JAVA are,
Classes:
Classes are known as the reference data types. Variables having class type data are called as objects. These are used for representing real-world situations. Objects are used for accessing the methods inside the class.
Primitive data types would have fixed size in memory and it can’t be changed. In reference data types there is no fixed size, by the use of new operator user can dynamically allocate memory. This new operator is used in the object creation, array declaration etc.
By using this kind of data type, we can define the real world things such as the properties of vehicles and specifically car etc.
Example:
computer c=new computer();
Here c is the object of class computer and we can mention this that c is the variable of type class computer.
Arrays:
Arrays are the collection of similar data types. For example, an integer array can hold a fixed amount of integer data type variables.
Example(integer array):
int a[]=new int[10];
or
int a[]={20,40,10,50,70,25,35,55,80,30}
Two important terms in the array are elements and index. Elements are the terms represented by the array. The terms inside the ‘{}’ are called the elements of the array. In other words, values inside the array are called as elements. Another term index which is used to access the elements, normally index starts with 0 and ends with the size of the array-1. In the above example a[10], the first element is stored in 0th place of the index that is a[0], the second element is stored in a[1] .... the last element that is 10th element is stored in a[9]th place.
Arrays are one of the important concepts of JAVA. Here we are mentioning that array is one of the reference data types in JAVA, but the array is the vast concept that needs to be clearly known for a programmer so all the aspects of arrays are fully explained in upcoming concepts.
Interfaces:
The interface in JAVA can be used for replacing the multiple inheritances in C++. Inheritance is the concept of deriving a subclass from the superclass. The subclass is also called as derived class and super class is also called as the base class. Multiple inheritances mean deriving a base class from more than one derived classes. This concept is implemented by interfaces in java. Interfaces can be discussed deeply in the following chapters.
Also read:
Java Classes Methods and Objects
Monday 19 October 2015
Learn Html in 10 minutes
Hai guys , in this post i am going to tell the basic about the html and to learn the basic web page creation using html tags and using some of the html attributes.
I have recorded a video for learning html in 10 minutes.
subscribe me on youtube
How to draw a line using c program
In this post i am going to tell how to draw a line using a c programming language.
The drawing can be performed in c program by including the header files <graphics.h>
here i am including my youtube video that will show you how to draw a line using the c program.
subscribe me on youtube
Saturday 17 October 2015
Create a Simple Application using .NET
.Net is a framework for Windows platform for creating web services , business logic oriented application, it is the secondary primary platforms currently being used to develop enterprise solution using web services.
.NET is mainly related with the service oriented architecture.
The .NET framework is a proprietary solution runtime and development platform designed for use with Windows operating systems and server products.
The .NET platform an be used to deliver a variety of applications, ranging from desktop and mobile systems to distributed Web solutions and Web services.
.NET is a Microsoft’s product and in this post i am going to tell how to create a simple application for calculating basic arithmetic operations by using Microsoft Visual Studio 2010.
So we have to first install the Microsoft Visual studio . You can get the Microsoft visual studio by simply clicking this link getintopc.com
Install the Microsoft Visual Studio, it will take some time to install so please wait till the installation finished.
After installation follow the below steps to create a simple calculation application.
In this post i have explained 12 steps to create a simple application using the .Net framework.
Create a .NET Project:
step 1: Open the .NET
Open the Microsoft Visual Studio .NET

step 2:Create a New Project
Open the File and click New—> Project or you can use the short cut key Ctrl+Shift+N

step 3:Create a Console Application
Then in the new project window Choose the Visual C# in the Templates pane and click the Console Application the displayed window
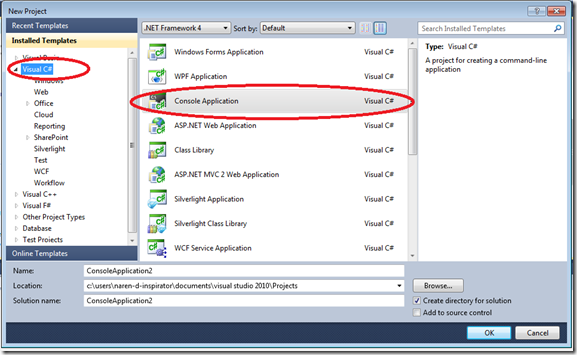
then type the project name as Calc and click OK.

Then the project will be loaded for further development of the project .
Then the Coding area will be opened as shown below
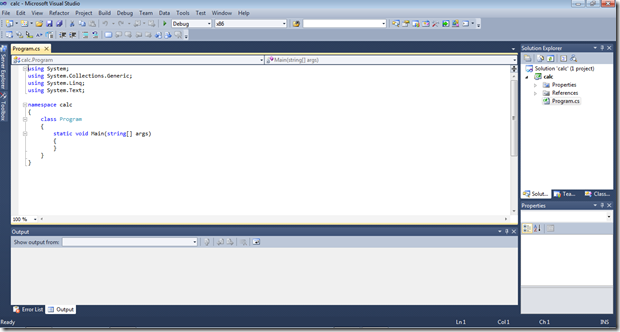
Here you can see that there is already some codes on the screen. These are basic codes that are used in every program.
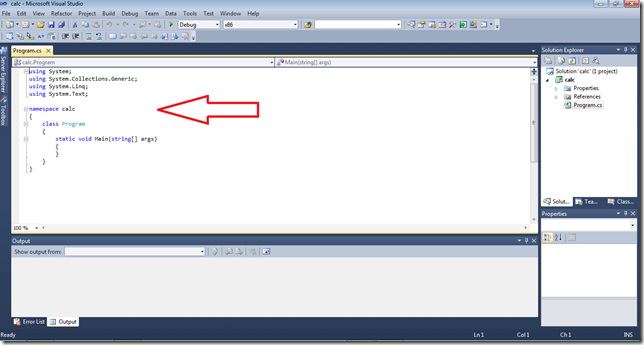
In the right side of the window you can see the project calc is opened in the Solution Explorer . If you are unable to see this Solution Explorer you can add this by going to view—>Solution Explorer or you can use the short key Ctrl+Shift+L.
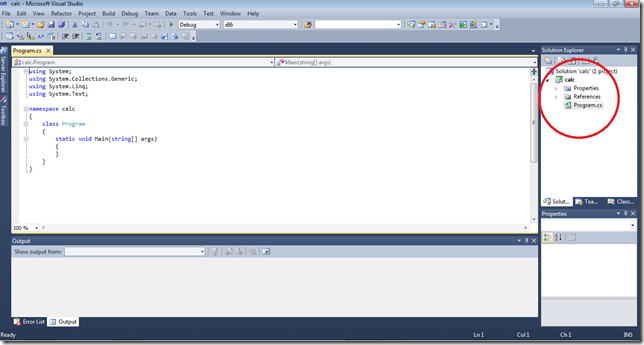
In this solution explorer we can able add new classes,and renaming the classes.
step 4: Create new classes
We are now into the coding part. First we need to clarify what are the classes we are going to use , in this example project i am going to use 5 classes including the Main class. The other four classes are add,sub,mul,div we should include the namespaces for these classes in the main class. Let the namespaces for these classes be addition, subtraction,multiplication and division.
Let we create the required classes first then we start coding.
To create a new class go to the solution Explorer and right click the project name Calc and click
ADD—>Class—>Class name—>ADD

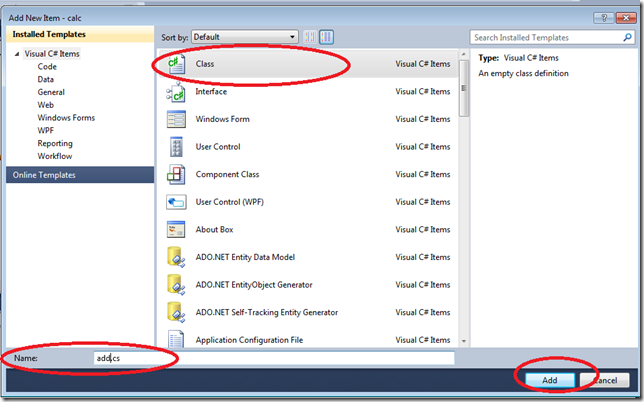
Since we are coding in c# the extension of this class is cs.
Thus we have added a new class called add that is used to perform the Addition operation. Now you can see that the class is added

We now change the namespace of this class calc to adding.

Now add this namespace in the program.cs which is the main class as using adding;

Like this we can add the other classes sub, mul ,div and namespaces subtraction , multiplication , division

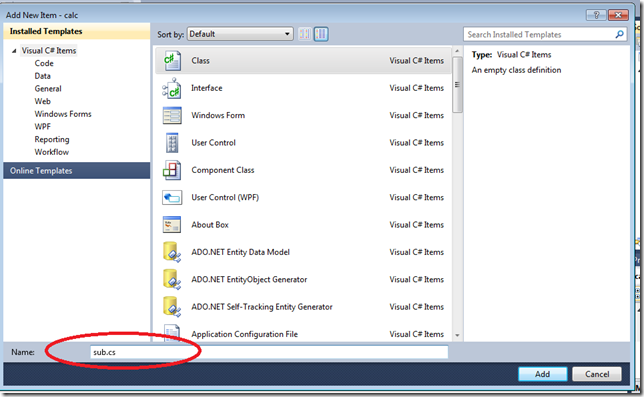
Then change the namespace to subtraction

Like this add the other two classes


Step 5: add namespace in main class
Now ad the namespace in the main class program.cs
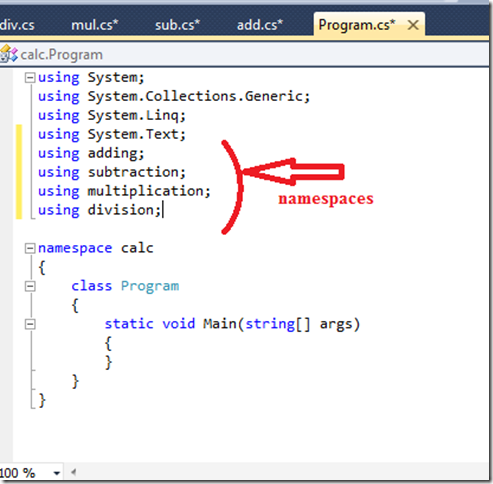
That’s it we have now created a skeleton structure for our simple calculator application.
Step 6: Start Coding
Now let we start coding from the add class…
Program of class add
Just Insert the below code within the class add
class add
{
public void adding()
{
string a,b;
int c,d,e;
Console.WriteLine(“Enter the 1st number:”);
a=Console.ReadLine();
Console.WriteLine(“Enter the 2nd number:”);
b=Console.ReadLine();
c=int.parse(a);
d=int.parse(b);
e=c+d;
Console.WriteLine(”Result={0}”,e);
Console.ReadLine();
}
}

Program Explanation:
The c# coding some what similar to the java programming.
Inside the class we have created a method called adding.
in that we have initialized the variable a and b as string type , so that it used to get the input from the user, but the input is integer so we have to convert this string value into the integer by using
integer variable= int.parse(string variable);
In this class we a and b as string type and c,d and e of int type. where c and d are used to store the values from a and b and the e is used to store output value.
If you are familiar with c programming you might have heard the use of printf , it is used to print a statement in the output screen , this work is done in .NET by using the
Console.WriteLine(“statement”);
Then to get the input from the user instead of scanf here we use
variable=Console.ReadLine();
in this program we get the two numbers for the calculation a and b and it is obtained by
a=Console.ReadLine(); and b=Console.ReadLine();
to convert we use
c=int.Parse(a);
d=int.Parse(b);
NOTE:while coding , c# is also case sensitive(the combination of lower class and upper class is very important)to print the output value we use
Console.WriteLine(“Result={0}”,e);
and to make the output screen stable we use
Console.WriteLine();
Step 7: code for other classes also
now code the other classes also, click the sub.cs and type the following code
Program of class sub
namespace subtraction
{
class sub
{
public void subtraction()
{
string a, b;
int c, d, e;
Console.WriteLine("Enter the 1st number:");
a = Console.ReadLine();
Console.WriteLine("Enter the 2nd number:");
b = Console.ReadLine();
c = int.Parse(a);
d = int.Parse(b);
e = c - d;
Console.WriteLine("Result={0}", e);
Console.ReadLine();
}
}
}

Program of class mul:
public void multiplication()
{
string a, b;
int c, d, e;
Console.WriteLine("Enter the 1st number:");
a = Console.ReadLine();
Console.WriteLine("Enter the 2nd number:");
b = Console.ReadLine();
c = int.Parse(a);
d = int.Parse(b);
e = c *d;
Console.WriteLine("Result={0}", e);
Console.ReadLine();
}

Program of class div
public void division()
{
string a, b;
int c, d, e;
Console.WriteLine("Enter the 1st number:");
a = Console.ReadLine();
Console.WriteLine("Enter the 2nd number:");
b = Console.ReadLine();
c = int.Parse(a);
d = int.Parse(b);
e = c / d;
Console.WriteLine("Result={0}", e);
Console.ReadLine();
}

step 8: The Main Program
We have finished coding all the other classes now we have to program the main program.
In order to start coding the main program we need to decide how the output screen must be shown to the user .
So , i wish display the list of operations available like this
1.Addition
2.Subtraction
3.Multiplication
4.Division
Enter your Choice:
So, like this the output must be printed, we can print this by using the code Console.WriteLine();
But how we perform to select an option that the user is requested it is by using a concept called as switch case
step 9:switch case statement.
the basic syntax is
switch(option)
{
case 1:
{
…….
…….
…….
}
break;
case 2:
{
…….
…….
…….
}
break;
case n:
{
…….
…….
…….
}
break;
}
By using this we can select the option from the user.
we will first create the baseline of this switch concept for our program
Console.WriteLine(“1.Addition”);
Console.WriteLine(“2.Subtraction”);
Console.WriteLine(“3.Multiplication”);
Console.WriteLine(“4.Division”);
Console.Writeline(“Enter your Choice:”);
h=Console.ReadLine();
op=int.Parse(h);
switch(op)
{
case 1:
{
Console.WriteLine(“ADDITION”);
}
break;
case 2:
{
Console.WriteLine(“SUBTRACTION”);
}
break;
case 3:
{
Console.WriteLine(“MULTIPLICATION”);
}
break;
case 4:
{
Console.WriteLine(“DIVISION”);
}
break;
Now we have created baseline of the switch case .
Ok now the Concept is simple that,
“ When the user presses the option for example 1 the method ‘adding’ in the class ‘add’ must be invoked to perform the addition operation or if 2 is pressed the method subtraction in the class sub must be invoked to perform the subtraction operation like this other two operations must be performed when the user presses the option ”
The above concept can be implemented easily by creating an object for each class and using that object we can invoke the methods available.
Step 10: Object creation
In order to understand the concept of object let consider an example Compare the class with a Lock of a house, the methods are the things inside the house and if we need to use those things we need a key to open the lock.
This is the same thing that is happening in the programming.
That key is the object.
By creating an object for a class(house) we can access the methods (things) inside the class.
I think now you are sure about what is an object!!!
That’s good , let we move back to the coding the program !!!
Let me tell how to create an object.
The Syntax for creating an Object is
classname objectname=new classname();
A class is a user defined data type. A data type is the type of the data we are using. For example int a;
In this the ‘int’ is the integer type and ‘a’ is the variable like that class is a data type this type is user defined data type and the object is the variable of the type of class.
The new is keyword that is used to assign the required memory for the class. The new keyword is used to dynamically allocate the memory.
So in case 1
we create the object for the class add
add obj1=new add();
In the above line add is the class name obj1 is the object name , there can be ‘n’ number of objects for a single class.
Like this i create objects for other classes also..
switch(op)
{
case 1:
{
Console.WriteLine(“ADDITION”);
add obj1=new add();
}
break;
case 2:
{
Console.WriteLine(“SUBTRACTION”);
sub obj2=new sub();
}
break;
case 3:
{
Console.WriteLine(“MULTIPLICATION”);
mul obj3=new mul();
}
break;
case 4:
{
Console.WriteLine(“DIVISION”);
div obj4=new div();
}
break;
Step 11: Access the methods
Then our next step to access the methods from the classes
the syntax is
object name.methodname();
switch(op)
{
case 1:
{
Console.WriteLine(“ADDITION”);
add obj1=new add();
obj1.adding();
}
break;
case 2:
{
Console.WriteLine(“SUBTRACTION”);
sub obj2=new sub();
obj2.subtraction()
}
break;
case 3:
{
Console.WriteLine(“MULTIPLICATION”);
mul obj3=new mul();
obj3.multiplication();
}
break;
case 4:
{
Console.WriteLine(“DIVISION”);
div obj4=new div();
obj4.division();
}
break;
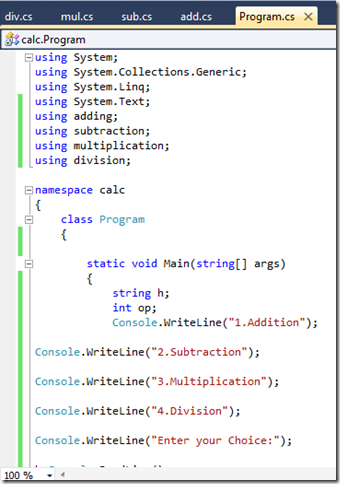
I think we have finished the coding let we check it
Program.cs


I also add another case 5: for exit option
case 5:
{
}
break;
That’s all guys we have done the coding part now we have to just run the application .
Step 12: Run the Application
To run the program just click the RUN button in the TOOLBAR.

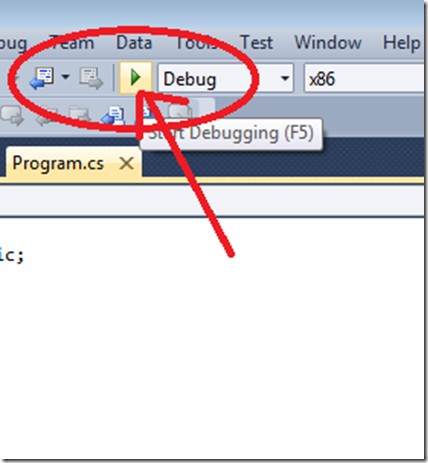
Click it and you will get the output
Output Screen

Output – addition
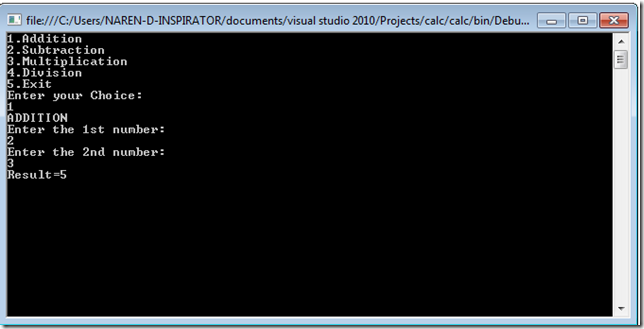
Output – Subtraction

Output- Multiplication

Output- Division
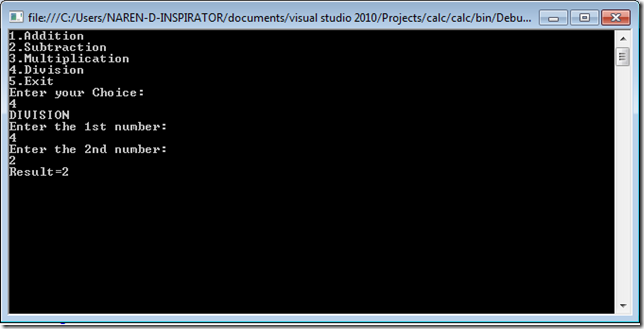
Output-Exit
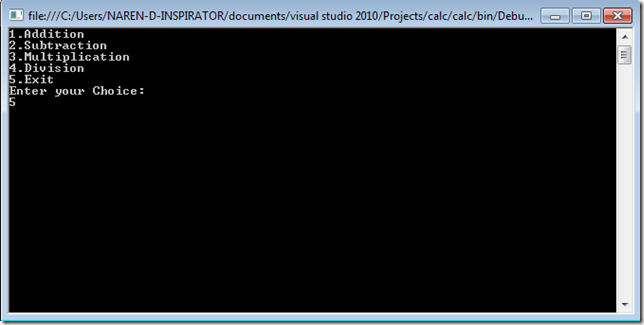
Output-Terminated

Congratulations !!!!
We have successfully created a calculator application using .NET .
Share the post if you Like ….
Subscribe to:
Posts
(
Atom
)


