Showing posts with label ANDROID. Show all posts
Showing posts with label ANDROID. Show all posts
Saturday 17 June 2017
How to Change Button image when button is clicked
Download Source Code of this Example
Read
How to Use Image as a Button in Android
After practicing the above example you can do this example.
Changing Button image when the button is clicked is popular in may android applications.
For example : In Movie tickets booking application , if we select a seat it's image will be changed to different color or image.
We are going to do the same in our Example.
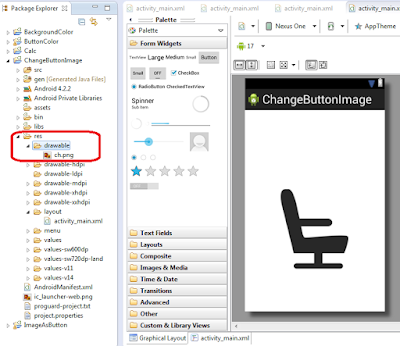
First create a new project drag and drop a button, copy a chair image from your computer and paste it in new drawable folder under res directory and do the xml coding part required to set the image to the button as you have practiced in the last example.
Till that you will get the result as:
Then also copy and paste another chair image which is in different color. i have choosen red color chair.
Then Open MainActivity.java and register the Button part and also include a boolean variable to check the button is clicked or not clicked.
Then use switch staement and type the code as in the image
public class MainActivity extends Activity implements OnClickListener {
Button chair;
Boolean b=false;
@Override
protected void onCreate(Bundle savedInstanceState) {
super.onCreate(savedInstanceState);
setContentView(R.layout.activity_main);
chair=(Button)findViewById(R.id.button1);
chair.setOnClickListener(this);
}
@Override
public void onClick(View v)
{
switch (v.getId()) {
case R.id.button1:
if(b)
{
chair.setBackgroundResource(R.drawable.ch);
b=false;
}
else
{
chair.setBackgroundResource(R.drawable.redchair);
b=true;
}
break;
default:
break;
}
}
}
In the above code i have used the if conditon to check whether the chair is clicked or not.
If the chair is not clicked the black chair will appear or if it is clicked red chair will appear, if the chair is clicked again the black chair will appear.
This condition will be useful in real time application because, the user may want to select a chair first but later he can choose a different chair, the application must be user friendly, thus we are using such a code.
the setBackgroundResource is similar to that setting background in xml file.
The output will be
When clicked again
You can try out with your own ideas also you can combine this with
Working with multiple buttons in Android
use switch statement with different button id's and with the help of if else conditon you can change multiple button's images.
Practice the previous examples well.
Wednesday 14 June 2017
How to Use Image as a Button in Android
Download Source Code
Still now we have learned to work with buttons, now we will learn to use images as buttons , as we see now a days in our mobiles.
Its just copy pasting a image in a drawable folder which is under the res folder and adding it in the activity_main.xml file.
In the post Changing color of a button
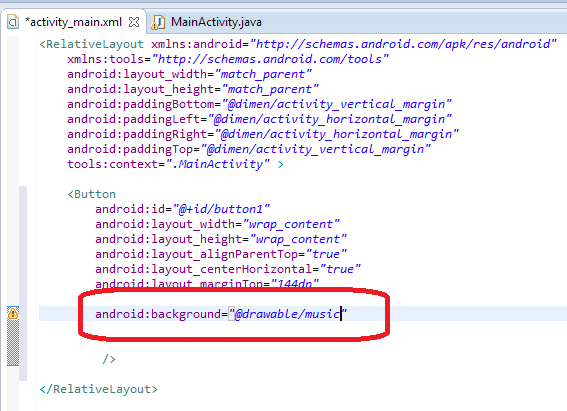
we used color code inside the android:background="#EAAC00" instead of the color code we are typing the location of the image ex: android:background= "@drawable/imagename" .
Let us see in detail.
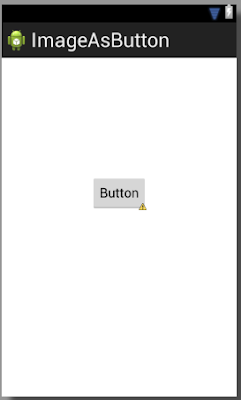
Create a New Android Application Project, and drag and drop a Button in the layout.
Now create a New Folder in the res folder named as drawable.
Right click on the res folder and click New---> Folder and name the folder as drawable and click Finish.
Now the created drawable folder can be seen below the res folder.
Now copy any image that you want use as button and paste in the drawable folder.
Copy image from your computer
and right click on the drwable folder and paste it.
Now you can see that the image has been pasted inside the drawable folder.
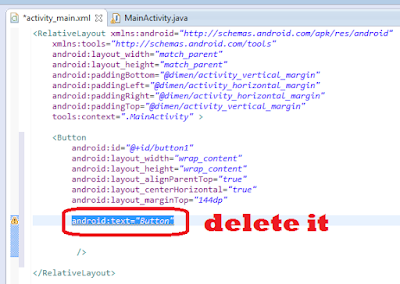
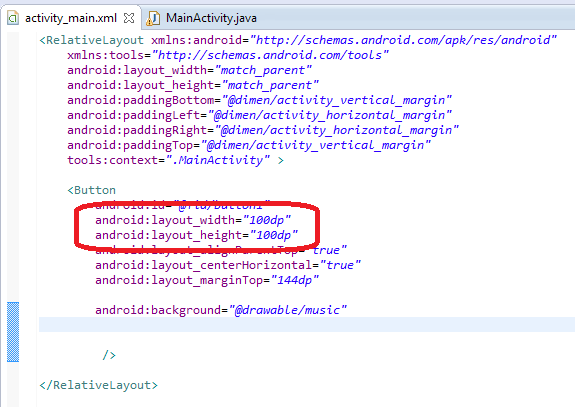
Now open activity_main.xml file and delete the android:text="Button" since we do not need any text for our image.
then add the following code android:background="@drawable/music" as in the image
Then save it and open the Graphics Layout .
Now the button is changed into an image, but it is too big, we can resize it by using the width and height property in the activity_main.xml file.
I am using 100 dp for both width and height.
save it and open Graphics layout
Now we can see the resized image button.
Now we want make some action for that button, we can simply use a Toast message for that.
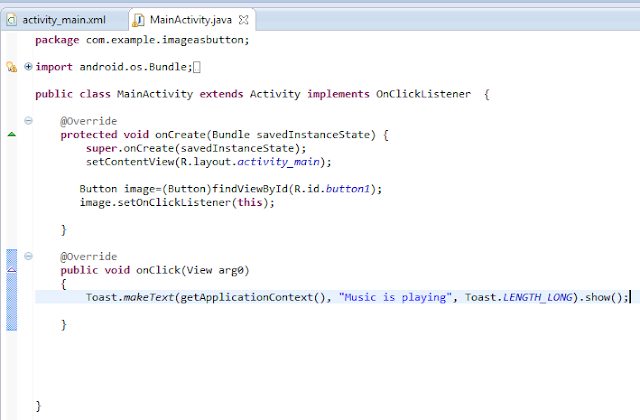
Open MainActivity.java and register the button , implement the listener interface and add the unimplemented methods as we saw in the post How to use Buttons in Android .
Then write the Toast message code
Now save and run the program.
Read
How to use Android Phone as an Emulator
You can try with multiple buttons using images as we saw in the post
Working with Multiple Buttons in Android
You can try the combinations of these example and make your own example.
Also Read:
How to change Background Color in Android
How to change Background Color in Android
Changing the background color of the Layout or screen in android is very simple to do.
Open a New Project in Android Eclipse
Enter the Project Name For Ex: BackgroundColor
and click Next till the Finish comes and also click Finish.
The new Project will be created
Click the activity_main.xml below this image to open the xml file.
Add the following line inside the Relative layout tag
android:background="#EACC00"
Then save the file and open the Graphics Layout you can see the background color has been changed.
The #EAAC00 is HTML color code , you get more colors from the internet.
You can choose your desired background colors for your android app.
Also Read:
How to change Button color in Android
How to change Button color in Android
It is very easy to change the Button color in android with just one line of code.
Open New Android Application project and drag and drop the button in the UI interface .
Then double click on the button it will take you to the activity_main.xml in which you can see the button coding
In that add the following code
android:background="any html color code"
After typing the code save it and click the Graphical Layout to see the change of the button color.
You can get the HTML color code in the internet.
It ranges from 0-9 and A-F , combination of these 6 digits will make a color.
Also Read:
Working with Buttons
Tuesday 13 June 2017
Simple Calculator app in Android
Download Source Code
This post is similar to that of
Adding two numbers in Android
We are using different operations like subtraction, multiplication,division and also addition.
Read Working with Multiple Buttons
This example is the combination of the last two post
Adding two numbers in Android and Working with Multiple buttons,so if you have practiced that well this program is easy for you or else practice that both examples and continue this example.
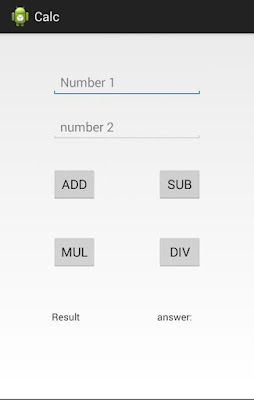
We need to make the design plan.
Create a new project and Just drag and drop and edit as per in the design.
The number 1 and Number 2 can be typed using the help of hint property.
To use the hint right click on the Plain Text and EditHint
Then register the buttons,edittext's, textview's in MainActivity.java
After that add switch case statement as in the last post and include the addition of two numbers example code and also include code for other operations also as in the image.
I think it is very easy to understand right! yeah it's so simple to develop android apps than you think if you have basic programming concepts and interest to learn!!!
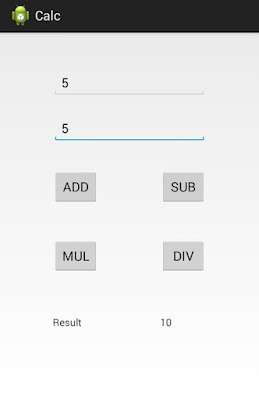
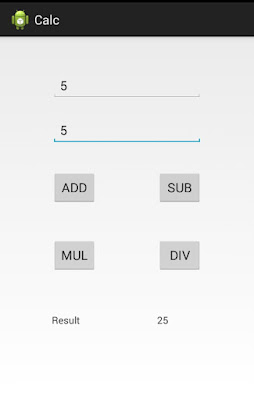
Let we see the Output
When clicked ADD Button
When Clicked SUB Button
When clicked MUL button
When clicked DIV Button
Practice this example more times and do it without referring any example codes.
It will make you to have strong knowledge in working with buttons.
The number 1 and Number 2 can be typed using the help of hint property.
To use the hint right click on the Plain Text and EditHint
Then register the buttons,edittext's, textview's in MainActivity.java
After that add switch case statement as in the last post and include the addition of two numbers example code and also include code for other operations also as in the image.
I think it is very easy to understand right! yeah it's so simple to develop android apps than you think if you have basic programming concepts and interest to learn!!!
Let we see the Output
When clicked ADD Button
When Clicked SUB Button
When clicked MUL button
When clicked DIV Button
How to use Android Phone as an Emulator
Practice this example more times and do it without referring any example codes.
It will make you to have strong knowledge in working with buttons.
Subscribe to:
Posts
(
Atom
)

